Python Using Singularity Environment
Step 1: Create Singularity Image (Python)
Section titled “Step 1: Create Singularity Image (Python)”To create SIngularity image (Python), run below command in the SSH terminal (CLI), for tutorial in accessing CLI, please refer to Shell Access and Useful Command
# Create new directory$ mkdir /home/${USER}/singularity_image
# Pull docker image by singularity$ cd /home/${USER}/singularity_image$ module load singularity$ singularity pull docker://slothai/numpy:1.15.0
# List pull image (Example: numpy_1.15.0.sif)$ ls –al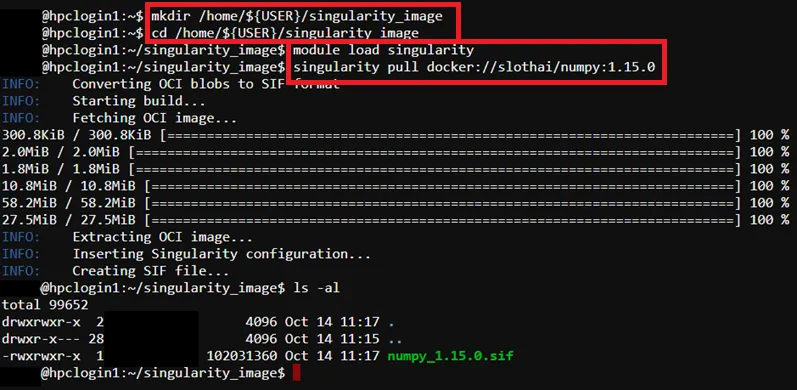
Step 2: Prepare Python Program Source Code
Section titled “Step 2: Prepare Python Program Source Code”Example source code path -> /home/$USER/job_template/python/numpy_test.py
import numpy as np
# Create a 1-dimensional array (vector)array_1d = np.array([1, 2, 3, 4, 5])print("1D Array:", array_1d)
# Create a 2-dimensional array (matrix)array_2d = np.array([[1, 2, 3], [4, 5, 6], [7, 8, 9]])print("\n2D Array:\n", array_2d)
# Perform element-wise operationssum_array = array_1d + 10print("\n1D Array after adding 10 to each element:", sum_array)
product_array = array_2d * 2print("\n2D Array after multiplying each element by 2:\n", product_array)
# Access elements using indexing and slicingprint("\nElement at index 2 of 1D array:", array_1d[2])print("First row of 2D array:", array_2d[0])print("Elements from index 1 to 3 of 1D array:", array_1d[1:4])
# Get array attributesprint("\nShape of 2D array:", array_2d.shape)print("Number of dimensions of 2D array:", array_2d.ndim)print("Data type of elements in 1D array:", array_1d.dtype)
Step 3: Prepare Job Template Script
Section titled “Step 3: Prepare Job Template Script”Pre-configured template script path -> /home/$USER/job_template/slurm_job/numpy_test.sh
Example template script
#!/bin/bash#SBATCH --job-name=numpy_test_singularity ## Job Name#SBATCH --partition=shared_cpu ## Partition for Running Job#SBATCH --nodes=1 ## Number of Compute Node#SBATCH --ntasks-per-node=1 # Number of Task per Compute Node#SBATCH --cpus-per-task=2 ## Number of CPU per task#SBATCH --time=60:00 ## Job Time Limit (i.e. 60 Minutes)#SBATCH --mem=10GB ## Total Memory for Job#SBATCH --output=./%x%j.out ## Output File Path#SBATCH --error=./%x%j.err ## Error Log Path
## Initiate Environment Modulesource /usr/share/modules/init/profile.sh
## Reset the Environment Module componentsmodule purge
## Load Modulemodule load singularity
## Run user commandsingularity run -B \/home/${USER}/job_template/python/numpy_test.py:/mnt/numpy_test.py:ro \/home/${USER}/singularity_image/numpy_1.15.0.sif \python /mnt/numpy_test.py
## Clear Environment Module componentsmodule purge
Step 4: Create Template (Web Interface Feature)
Section titled “Step 4: Create Template (Web Interface Feature)”To submit HPC via web interface a job template is required, details please refer to: Create Template (Web Interface Feature)
For Job submission via CLI Terminal, please skip this step.
Step 5: Submit HPC Job
Section titled “Step 5: Submit HPC Job”Guides for submitting HPC job, please refer to: HPC Job Submission
Step 6: Remove Singularity Image (Optional)
Section titled “Step 6: Remove Singularity Image (Optional)”$ rm /home/${USER}/singularity_image/<image file>.sif